Showing posts with label funky project. Show all posts

Sunday, August 7, 2016

Birdhouse Trim, Perches and Stands 2

Have Metal Poles, Will Travel

 I've got another metal pole ready to go

Almost as tall as the bird feeder in background

Rescued cedar block + barnboard base + metal pole = sturdy birdhouse stand.

Once I build a support platform for a birdhouse (Which one? I'm not sure) I will display it outside the shop to see if any birds are curious. I don't know if I will get any takers this year.

Please link to Birdhouse Trim, Perches and Stands

Photos GH

Thursday, June 16, 2016

Funky Specialty House: Birdcage Stand + Birdhouse

Fly Me to The Moon

This birdhouse ensemble is on the move!

Attention yard sale shoppers!

Let's do some math:


Birdcage stand + wren house + Tonka airplane = a unique project

I think I will include this with yard sale items on Saturday morning (8 AM - Noon) at Cathcart Street's Biggest Sale in Old South History (between Elmwood Ave. and Duchess St.).

Come one, come all.

The Tonka airplane needs a pilot. You maybe?

Please link to Upcoming Projects: Barnboard Birdhouses and More

Photos GH

Tuesday, December 22, 2015

The Big Sweep 2

Down to the Last Shelf


I am almost finished my last job in the workshop for 2015, i.e., the Big Sweep. Just about every saw and hammer and piece of wood has been wiped clean. Just about every shelf surface has been vacuumed. I am down to the last shelf to vacuum and handful of lumber bits to save. When you smell a nice cedar blaze, you'll know I'm all done.

Link to Last Job, 2015

Photo GH

Monday, November 30, 2015

Funky Birdhouses - For Hobbits 6

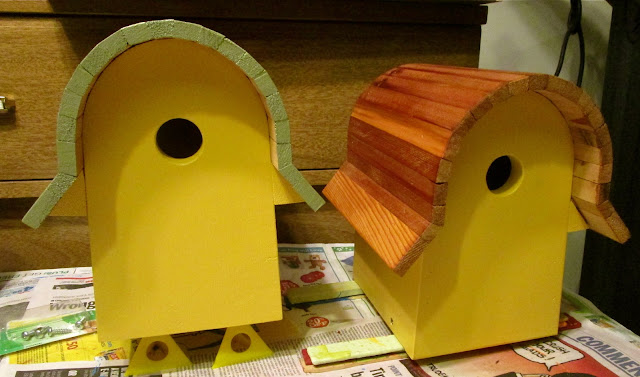
Voila!

"All the trim is in place except for the support stick at back"

Once the trim dried I attached all the pieces in less than ten minutes. The chimney took more time to get into the right position than anything else but I think the final wonky angle suits the Hobbit house just fine.

I will not attach the support stick to the back - I'll let a buyer do that job, if it's desired - because then the birdhouse is harder to store on a shelf or pack into a box.


Hobbit house Number 2, with varnished cedar roof, should be finished by Friday. Maybe.

So, 'maybe' more to follow in 2015.

Link to For Hobbits 5

Photos GH

Saturday, November 28, 2015

Funky Birdhouses - For Hobbits 5

Two Hobbits, Two Coats


The two Hobbit houses not only need two coats of paint (or varnish on one's roof) but two coats of paint on a bucketful of pieces of trim. I'll let the trim dry overnight, then return to the workshop tomorrow for about 10-minute's work with completed trim. I think the finished product will certainly be unique.


More to follow.

Link to For Hobbits 4

Photos GH

Friday, November 27, 2015

Funky Birdhouses - For Hobbits 4

Table for One?


I have two Hobbit houses on my paint table but only enough trim for one of them. Trim for one takes up all the space! No wonder I only make a few of these 'funky houses' at a time.


Progress is slow but my boss is easy to get along with most days.

Link to For Hobbits 3

Photos GH

Thursday, November 26, 2015

Funky Birdhouses - For Hobbits 3

First Coats AOK

"The Marine varnish shows off the rich western cedar slats"

With first coats done I have the feeling the Hobbit houses look AOK - I may do more in the future - and at least one may be ready by Saturday.

That being said, I also get the feeling, when I look at them straight on, there's a guy or gal somewhere with a bad '60s haircut that is saying, "That birdhouse looks like me!"

: )

 So, one psychiatrist says to the other, "How are you today?"

And the other one says, "What did you mean by that?"

Link to For Hobbits 3

Photos GH

Wednesday, November 25, 2015

Funky Birdhouses - For Hobbits 3

I Like These Cedar Roofs


Count 'em. The roofs are tricky because 18 of the 20 cedar slats have to be angled, sometimes on both sides, in order to fit properly and tightly into place. (A standard birdhouse has two or four slats). On a Hobbit house, 30 - 60 minutes per roof is the norm. Why, I could make a giant snowman and grow carrots for its nose in that amount of time!

That being said, I like the final result and will paint one roof and coat the other with Marine Varnish. Then I'll work on the trim. I'm pretty sure the trim will take more than the standard amount of time too, what with the curved chimney and all!


Link to Funky - For Hobbits 2

Photos GH

Monday, November 23, 2015

Funky Birdhouses - For Hobbits 2

Yellow Paint


Because the process of cutting cedar slats, angling them properly so the roof won't leak and then attaching each slat perfectly into place will take a bit more time than work on a standard birdhouse, I only built two Hobbit houses. And as you can see, they are now covered with their first coat of yellow paint and waiting for a second.


Some will say, "Hobbits wouldn't live in yellow houses. The colour would be too easy to spot by malicious Orks and other horrible woodland creatures."

My reply: Harrison Hobbits love yellow houses and simply build escape hatches in the basement.

Link to Funky Birdhouses - For Hobbits 1

Photos GH

Sunday, November 22, 2015

Funky Birdhouses - For Hobbits 1

Starts With a Sketch

"Yes, it has wings!"

I have built birdhouses in the past with curved roofs, but not with rounded ones with a 'wee flair' on each side. All the paint work will try my patience, and cutting the roof slats so they fit together tightly on the curve will so the same, but I am down to my last 'funky' on the shelf, so it was really time to try my hand at them again.

"Sometimes I sketch on napkins, other times on sudoku sheets" : )

I think I'll have fun with the chimney and other details, e.g., a rounded door with metal strip overtop, and maybe - okay, maybe - I'll have one done by next Saturday, in time for my next sale.

 "I modified the sides - to 4" Height (H). Shorter roofline now"


"The cedar roof (right) won't need paint if lined up nicely"

Link to Funky Birdhouses 7

Photos GH

Wednesday, September 30, 2015

Funky Birdhouses 7

The Last Two Funkies


I will continue to make birdhouses with curved roofs and lots of trim. Someone recently commented on their "California style". I've also heard that the colours are "Miami style". Whatever the case, I like to do small batches at a time - when I am in the mood to paint and paint and paint.


I will add the yellow perch (golf tee, foreground) and say "Voila!"

Done. 

Link to Funky Birdhouses 6

Photos GH

Tuesday, July 28, 2015

Gord's Gourd 2

The Second Coat, Saw and Seeds

 "Sun-dried force of nature"

I am looking forward to expressing myself artistically once a third coat of light green paint is dry. Something with circles and swirls and gobs of colour.

"I think I collected over 200 seeds for next year"

"I will gently sand the entry hole. Looks like a chipped tooth now"

FYI - Using a pair of pliers and a hack saw blade, I was able to remove a large, leathery chunk of dried innards via the one-inch hole, and in the process I chipped a tooth, but collected scores of seeds for next year's crop of gourds. I could be onto something.

More funky paints to follow.

Link to Gord's Gourd 1

Photos GH

Saturday, July 25, 2015

Gord's Gourd 1

Another Funky Project


Look at the top left corner of the dresser in background.
Can you spot the seeds for next year's gourds?

I saw this gourd at Gathering on The Green in June. Price tag - $10. There was not one drop of paint on it and it had a twig as a perch. But an idea instantly started to form in the technicolour storage room located three inches behind my left eyebrow. "Hey, buy it on spec," said the Storage Room Manager.

Yesterday, while painting 'this and that' type of trim for another birdhouse a particular colour - still dripping from a small paint brush - seemed just right for the gourd. I fished a few seeds out of its innards and went to work.

Where will this end? Stay tuned.

Link to Vintage Trailer Birdhouse 1

Photos GH

Thursday, July 23, 2015

Funky Birdhouses 6

Trim - First Steps


A few days ago I traced the front edge of the curved roofs onto thin strips of white pine, cut them out on a band saw and painted them w two coats of paint matches the body of the BH.


Okay, now what? I'm thinking... same trim on the body as last time... or something else? Hmmmm.

More to follow.

Link to Funky Birdhouse 5

Photos GH

Monday, July 20, 2015

Funky Birdhouses 5

Time to Paint


Out of the workshop and onto the paint table with curved trim for roof edges already to go.

I have the feeling there will be more pieces of trim added once I know what I'd like to do!

So stay tuned.

Link to Funky Birdhouses 4

Photos GH

Sunday, July 19, 2015

Funky Birdhouses 4

Curved Roof and Trim

 "Time to turn thin strips of cedar into a curved roof"

I didn't think I'd ever say this because the curved roof is fussy business, but, now that I'm a bit more used to the process, I am going to make another batch of six of these babies. I like them. 

 "Thin strips (3/8th inch) of white pine will be painted asap"


 "Curved roofs need curved trim, of course"

"I will stand the boards on edge, cut them right down the centre"

Oh yeah. More to follow.

Link to Funky Birdhouse 3

Photos GH

Friday, July 17, 2015

Funky Birdhouses 3

What Next?


Two coats of bright paint are enough for these funky models with curved roofs.

In front of each is a pile of narrow slats, ready to be added to form a solid roof. So, tap tap tap will be the order of the day, then more bright paint.

Busy days ahead. More to follow.

Link to Funky Birdhouses 2

Photo GH

Tuesday, July 14, 2015

Funky Birdhouses 2

Bright Colours


Yesterday I lined up three 'curved-roof funkies' on my paint table, opened three tins of paint and went to work w first coats. Thirty minutes later I felt AOK with the colours.

(Wren houses off to the left side look AOK too.)

More to follow.

Link to Funky Birdhouses 1

Photo GH

Saturday, July 11, 2015

Funky Birdhouses 1

New Batch of Funk


I use new (planed) pine boards to build funkies because I will paint each one and all of the trim. A new batch of three is now underway.

"Thin strips for roofs will be attached shortly"

Link to Funky Birdhouse 8 to view an earlier batch of funky models.

Photos GH